User Management:
Overview: This document would give you an over view about how easy it is to organize and manage the users in shop. User Management module allows admin or users with roles to manage the users in shop who can be internal or customers or dealers or for that matter any one. They can easily be given Rights, Roles, assign to different groups or any other special permission which will enable them to perform or access certain special functions of the shop.
Users/Customers in Shop
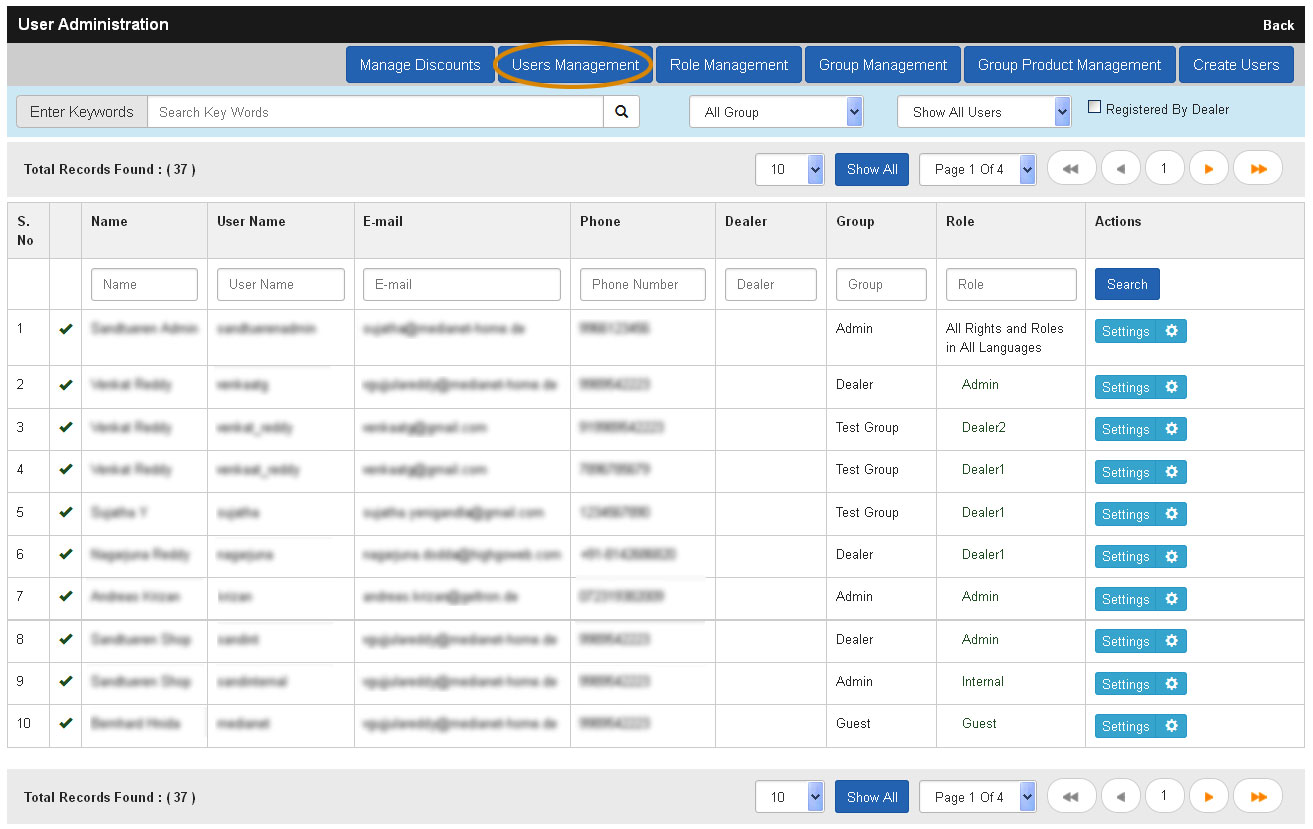
In the web shop there will be by default an admin user which comes with the installation and integration. There after all the users are to register them self in the web shop. This they can do simple by selecting if they are individual user or business user. Business user is for companies to register and individual users is for direct customers. It is up to shop admin if wants to allow which kind of users/customers to register. If the shop is meant to be a B2B shop then he can easily disable the individual registrations, then only business customer would able to register in the shop as for business customers it is mandatory to give their Tax Number while registering. All customers who registered in the shop are considered as users, all the users can be found by the shop admin in the admin end of the shop in User Management menu.
Roles and Rights
In the shop the different modules and their features, functions are considered as Roles and Rights respectively. And these different modules which we call Roles are usually to be managed by different departments with in the company, like for example, Products and its datas and inventory are be managed by one department and Orders, Invoices are to be managed by another department, so for that reason we have given the possibility for shop admin to create different Roles based on a group of rights which are intern based on Modules and their functions. So a shop admin can create a Role easily by selecting a group of rights and then assign this roles to different users, either to one user or to multiple users.
Creating a Role
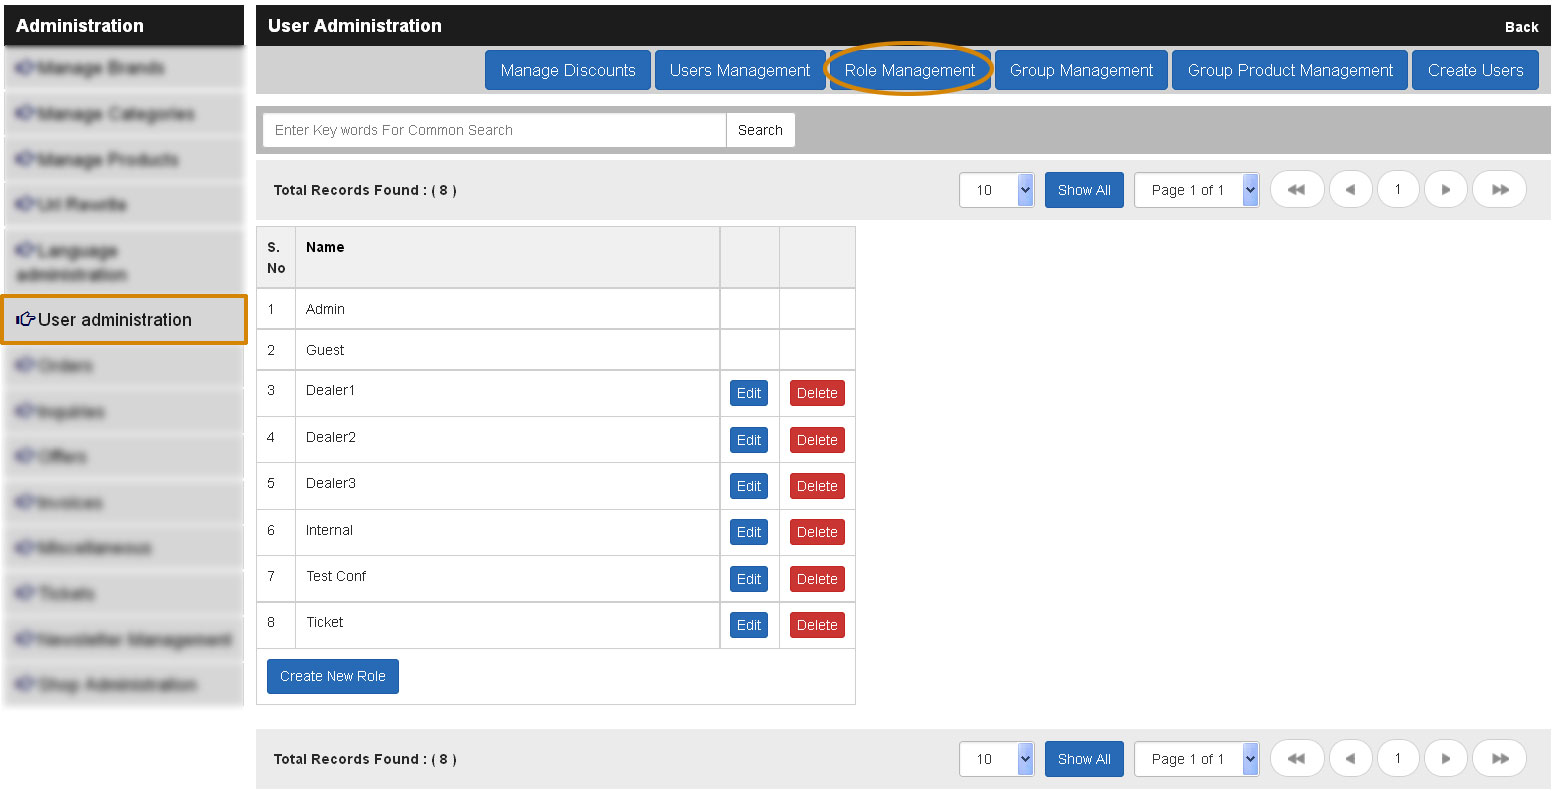
A Role can be created either by shop admin or user having the Role to create. The option to create a Role can be found in the User Management menu, once in user management, on the top of the table showing the list of users you will find the button Roles Management, clicking on it opens a page where you will see all the existing Roles you have created and if you have not created any Roles yet then by default you will see the Admin Role as well as Guest Role, Admin role is for the shop admin login and Guest role is a default role for all the registered users in the shop. To create a new Role, click on the Create New Role button, a pop opens displaying all the shop modules along with the functions inside the modules. We call as those functions as the Rights, you can select the various rights which you find under different modules, and for each right you can choose language, which is whether you want the right to be available in one language or all languages etc. Once you select all the rights you want to then you can give a name to that role and save it. For example, if you want to create a role like Billing Management, then click on create role and then click on select rights. In the pop up you can select the following modules, Orders, Inquires, you can choose if you want to give only the possibility of viewing or editing, if the Role users should only View them and not manage them then only select View, if he has to manage them then you can select the View, Edit option. Then after selecting the suitable rights click on save and the role is then saved which you can see in the Roles View page. Like this way you can create any number of Roles in the shop.

Assigning a Role to User
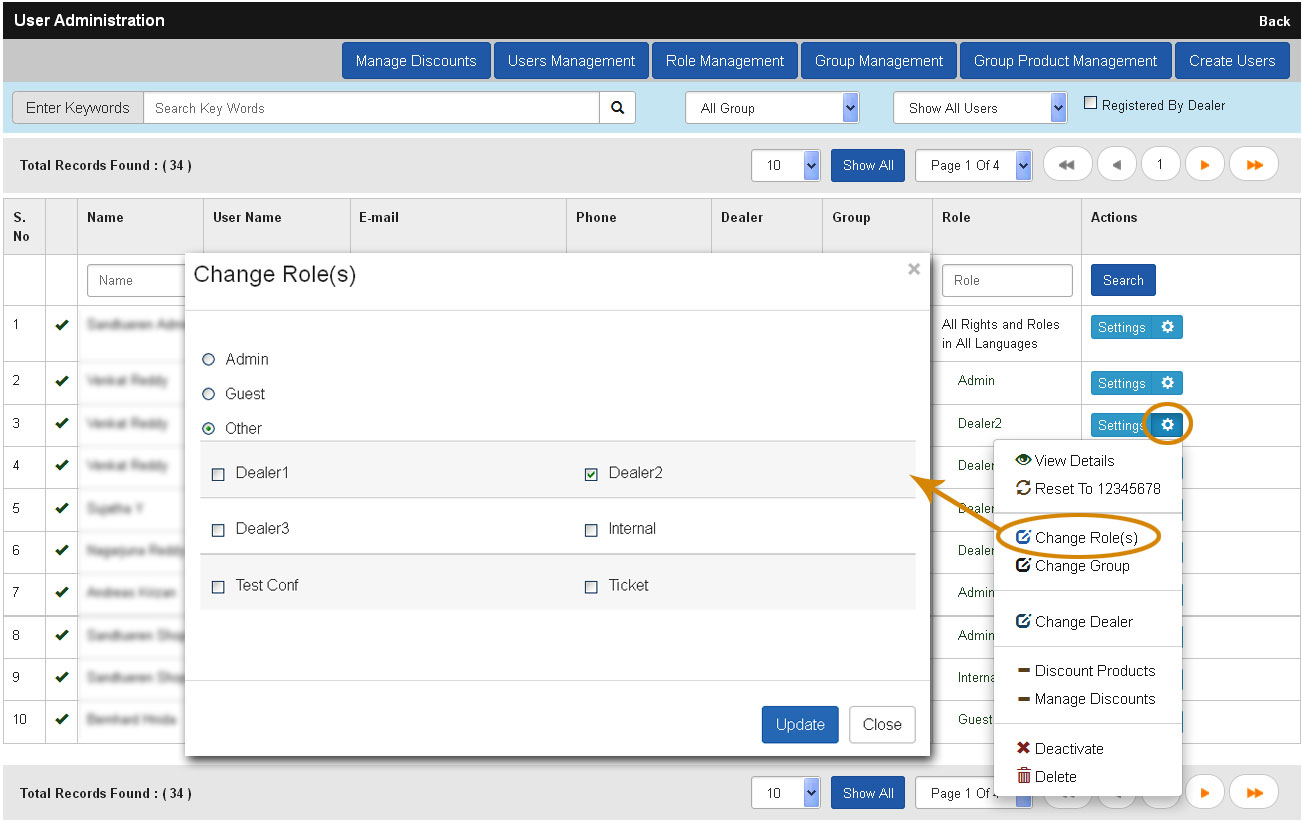
In the user management page you will find in the far right for each user row certain options to manage the user settings. Click on the Settings and you will find the option Change Role, click on it and a pop up opens up, showing the current role of the user along with the available roles. By default you will Admin and Guest roles and all the other Roles which are created can be found in the selection Other. Select the options Other and then below you will find a list of all Roles which have been created by the shop admin. You can now select any role or multiple roles from the Roles available by selecting the check box adjacent to Role. This way you can give the user a Single role or Multiple Roles. If you want to give any user all the Role similar to Admin then you can even choose the Role Admin. Please note if you give any user Admin role then the user would be having access to the complete back end of the shop as well as access to all the Editing and Managing options. So it is important that you choose the right Roles while assigning them to users.
Groups Management
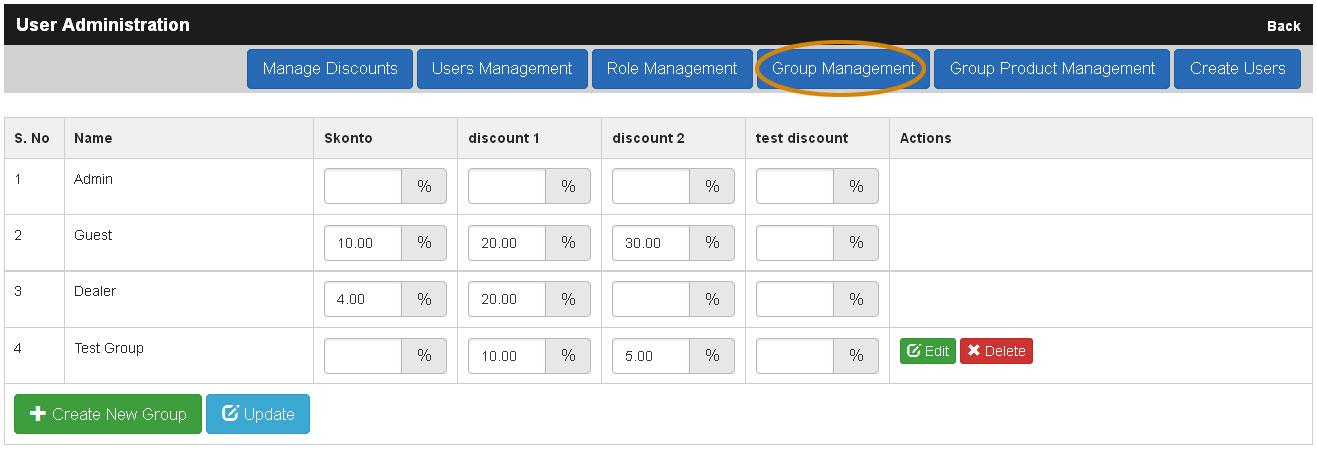
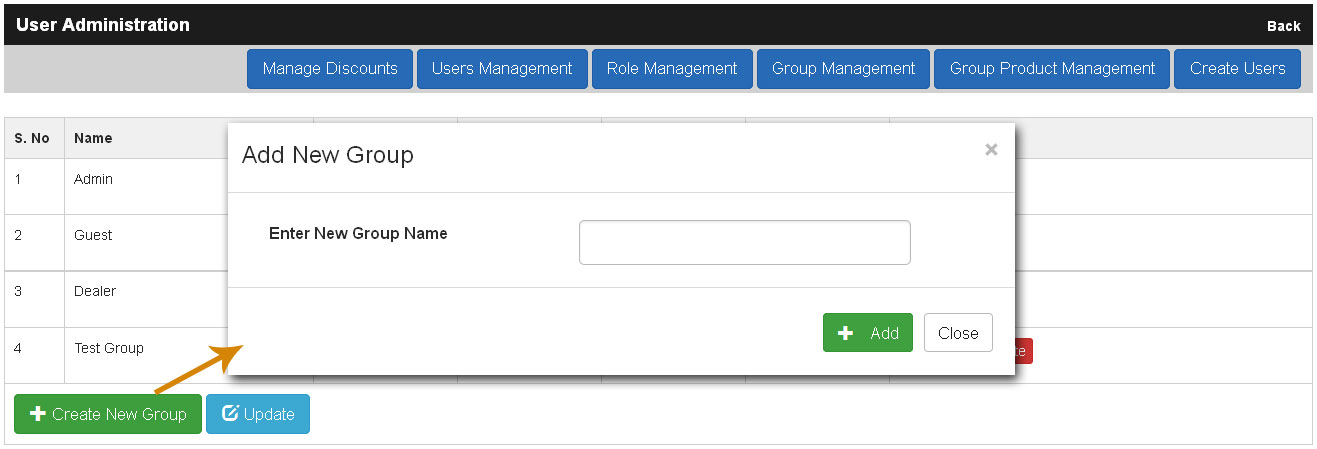
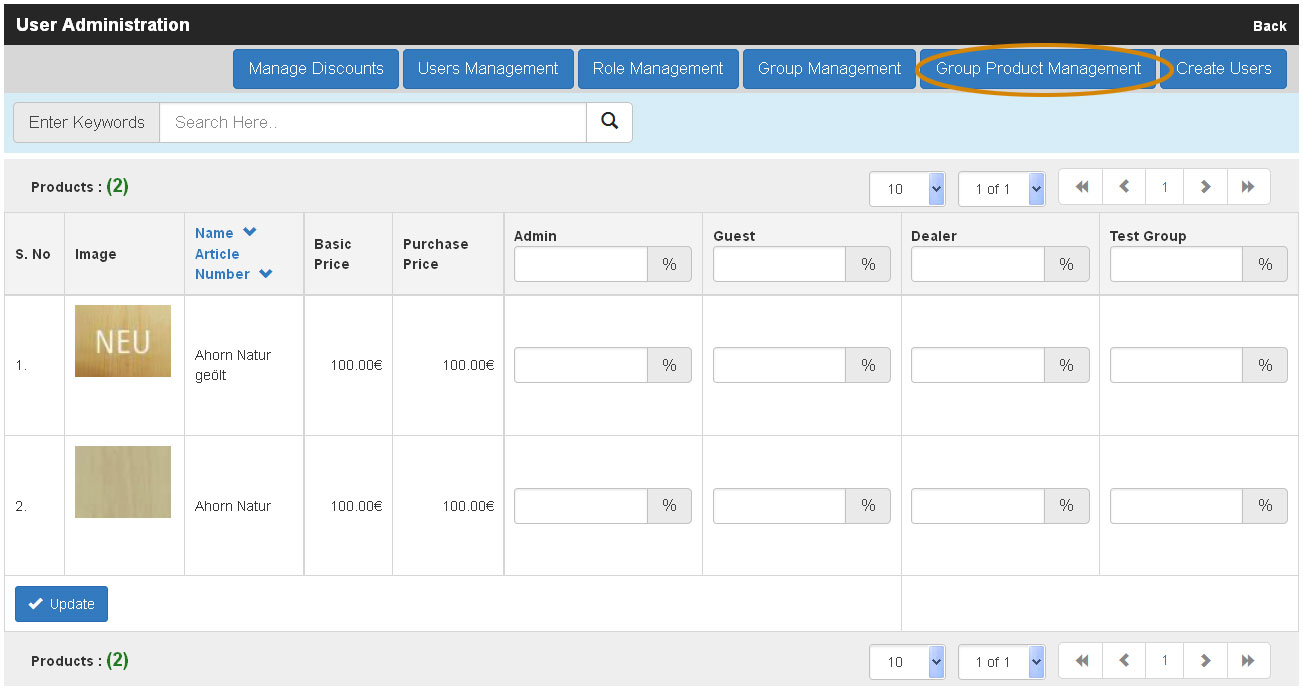
Groups management is to organize different users into groups so it is easy to manage the price discounts of users via the groups. It is also possible to manage the price discounts for users individually but via the user groups it is much easy to manage the discounts of group of users at on go. To manage the user discounts via groups we have the option called Group Management. Click on the Group Management button which you find in the top, clicking on it takes you to page where you see a list of groups. In this page you can see already the existing groups and further option to add new group and edit or delete any of the existing group. To add new group, click on Create New Group button, a pop window appears requesting you to give a name to the group. Once you give a name click on Add and new group is added. Adjacent to each Group you will find the different discounts applicable for group wise users. You can simply enter the % of discount for each discount type. Which ever discount you have assigned to the group is applied to all the users part of the groups. Also it is possible to assigned the discounts products wise. To access that click on Group Product Management button, a page opens in which all the shop products are listed, for each product row adjacent to product name you will find the group names. Here in each user group column you can enter a percentage of discount for the single product or group of products via the common field which can be found in the top of the table.
Assigning Groups to Users
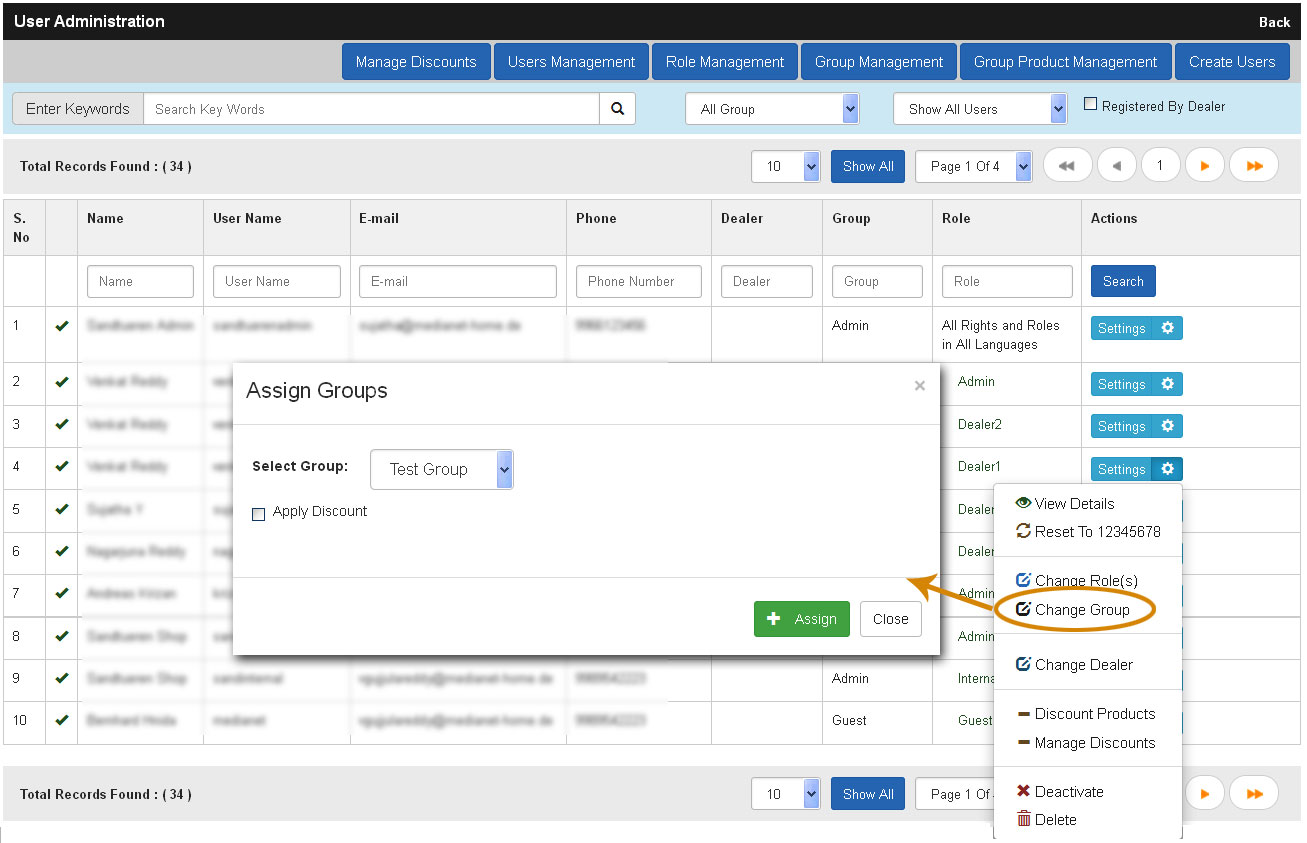
To assign a group to user, click on the settings in the users listing, you will find in the option Change Group, click on it opens a pop up from where you can select the Group from the drop down list. Choose the right group and click on Assign and the user is then assigned to that group.
Assigning of Dealers to Users
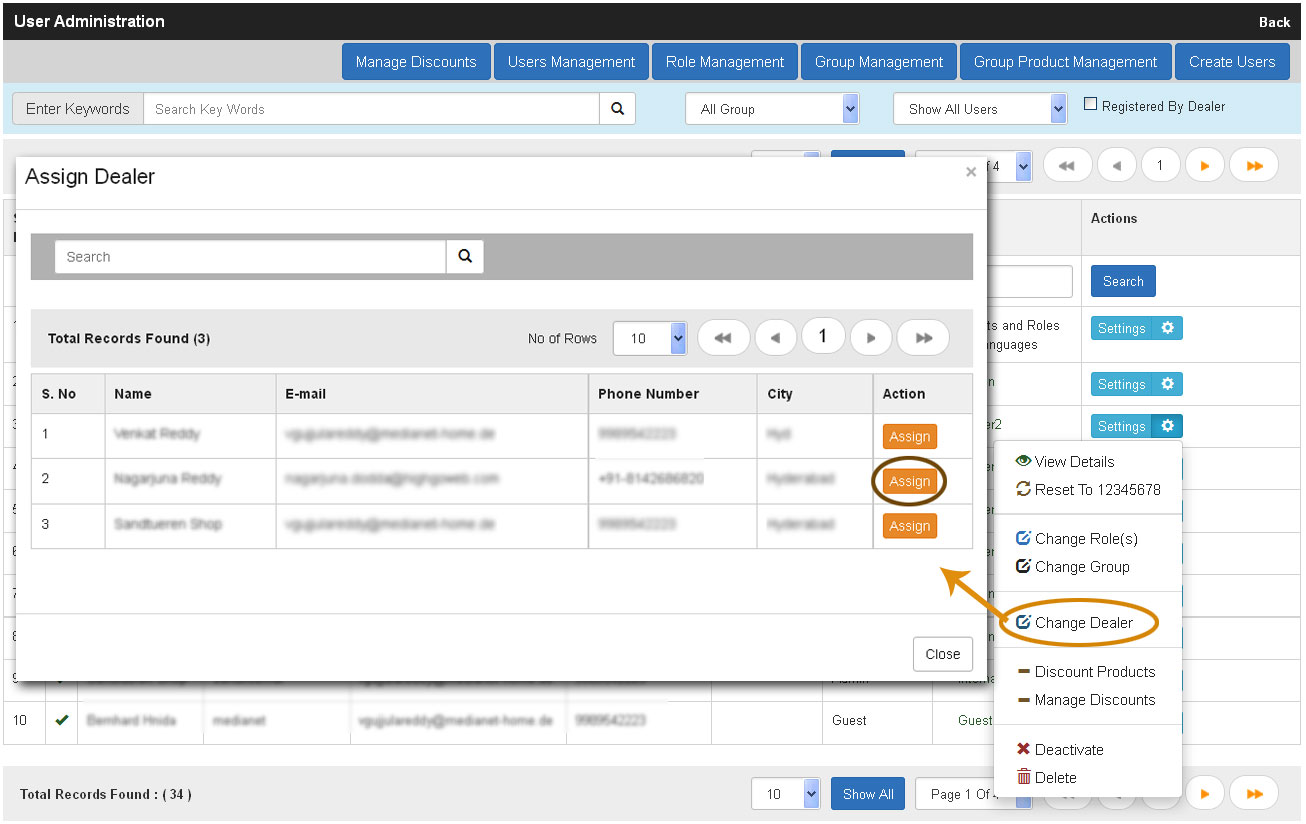
For allowing dealers with out child shops to use main shop to manage all their customers and more this option is available. Assigning a dealer to user makes the dealer responsible for that user activity such as deciding on the discount of the user, ordering on behalf of user and more. To assign a dealer to a user, click on the settings in the user management page, in the options you will find the option Assign Dealer, clicking on it takes you to a page where all the dealers in the shop are listed. From the available dealer you can select a dealer and click on Assign which you find in the far right of the Dealer row. Now the selected user s assigned to that particular dealer. All users who have been assigned dealers can be accessible now for the Dealer once they log in. They can create offers manage the customer orders and etc for all the customers assigned to them and also they can manage special discount prices for the users under them too.
User Activation
All new users registered via the shop are to be activated by shop admin or users who have access to user management. Every time a new users registers in the shop, shop admin or the users who are allowed to activate receive an email notification informing about the new user registered with their details and link to activate, once clicked on that link a page opens where admin can enter the security code then click on Activate to activate the user. If by any chance they miss the email, then the user can also be activated via the shop admin, user management interface, click on the settings button for an individual user and there in the options the link Activate will be there, clicking on it simply activates the users. Only activated users can login, so when ever a user is activated then they are notified that their account has been activated and they can now login in the Shop. It is also possible to deactivate or delete the user altogether from the admin user management interface if the need arises.