Configurator Back End:
Overview: In this document we would give you an overview about how to use the configurator back end to create different flows/models for the user end graphical configurator for end users. Admin or users with role can access the Back of the Configurator after login. Using this back end it is very easy to create many different flows/models and give options and possibilities for the users to let them configure their preferred doors.
Configurator:
A Configurator is an online tool which gives the possibility for customising products with preferred choices for end users of a web shop or website. If we take the example of the Door Configurator, then we can allow the general users to configure them self a door for their homes. We would give the user the possibility to select the shape and design of the door by presenting him all the available models and designs and once he selects a model, design he can choose the different materials he want for the door including colors and in next step he can choose the size and going ahead he can choose the door handles, hinges and wall thickness and etc. So based upon the model, design he selects all the next available options available for selection unfold and he can choose options of his selection one after another and configure all by him self a door of his choice. To summarize the Configurator gives the possibility and flexibility for the end user to customise the product with his preferred choices.
Configurator Back End:
The configurator back end is to manage and organize the different flows, options and possibilities for customisations. Via the back end we create the different flows and for these flows we define different steps and stages involved for customisation and for each of the steps and stages we assign the options and values.
Adding New Model/Flow:
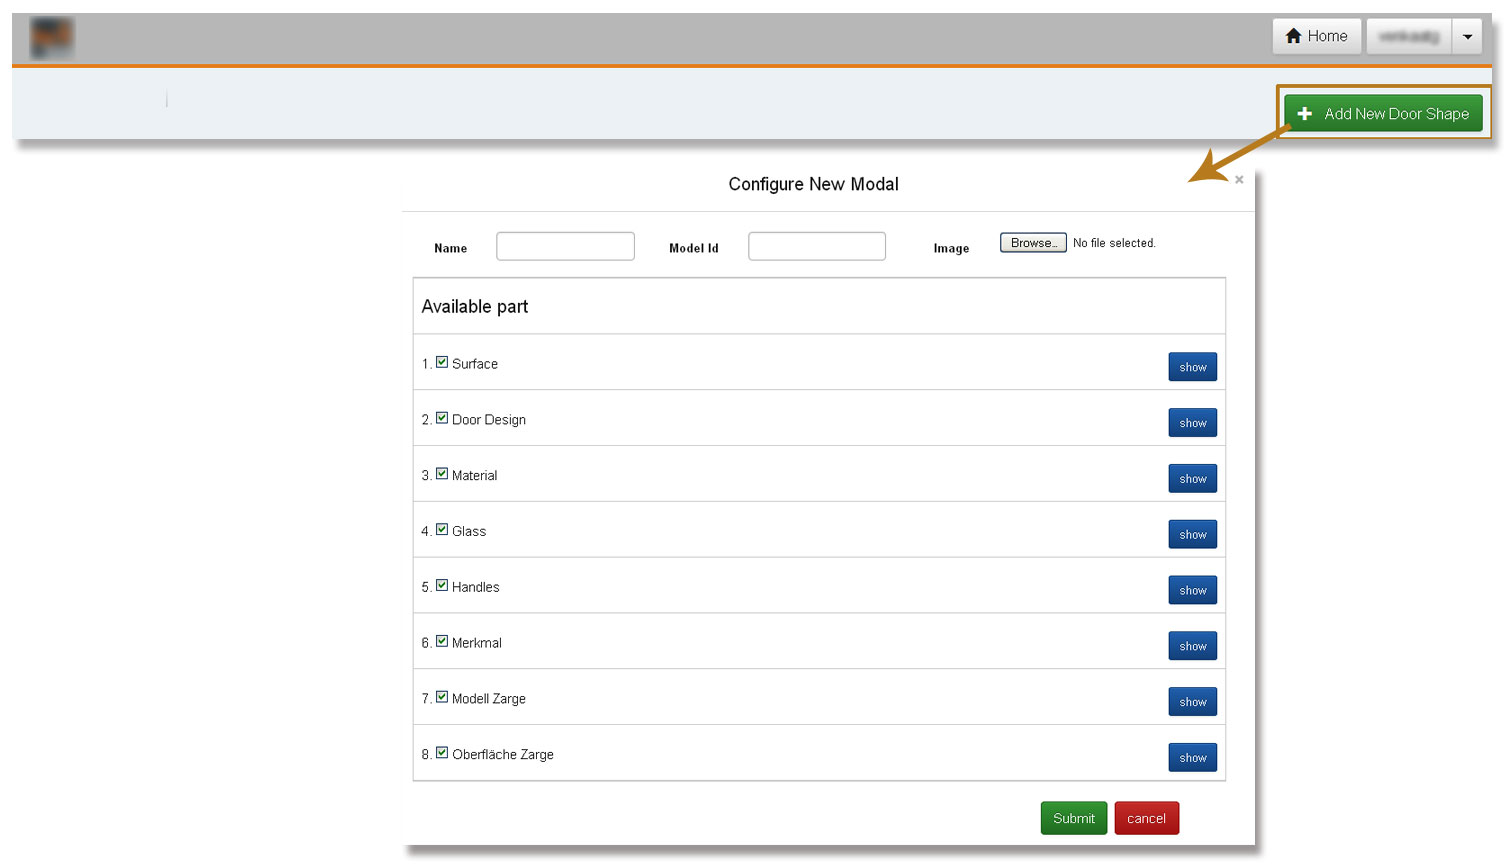
Shop admin or user with roles can access the back end of the configurator if they are logged in. The link for the back end can be found in user end of the shop on the left side under the categories. Click on it and you are taken to the configurator back end, here in this page you can see already existing models/flows. To create a new model/flow click on the Add New Door Model, a pop up opens up requesting you to give more details about the model as well as prompting you to select different steps and their values for configuration. It is up to you if you want to give all details directly in this pop up window or you can just give the basic details and then configure the more details after adding it. So you can basically add a model/flow by just giving it a name, a model ID, you can upload a picture for this model, and then click on add. By default all the steps and its values are pre selected, so when you add with basic details automatically all the steps and its values are also added to the new model. If you do not want any of the steps and values to be added to this model you can just uncheck all the different steps and their values one by one and select only application steps for this model. For example, if you added a glass door, then you do not need to have the steps like Surface Material and Color options there and like wise if you have selected a wooden door model then you do not need to have a step for selecting different Glass designs and models. So based on the model you intend to create you can select only applicable steps while adding.
Setting up a Flow/Model:
Once a model/flow is added, you will see the new model along with already existing model. Select a model for setting up by clicking on the model. You will now be taken into the model admin end of the configurator. In there on the top you will see all the steps for the model. By default all the steps are shown for all the models with the possibility to activate and deactivate certain steps on demand. And it is also possible to add a new step to the configurator.

Adding of Tabs/Steps and Organising them:
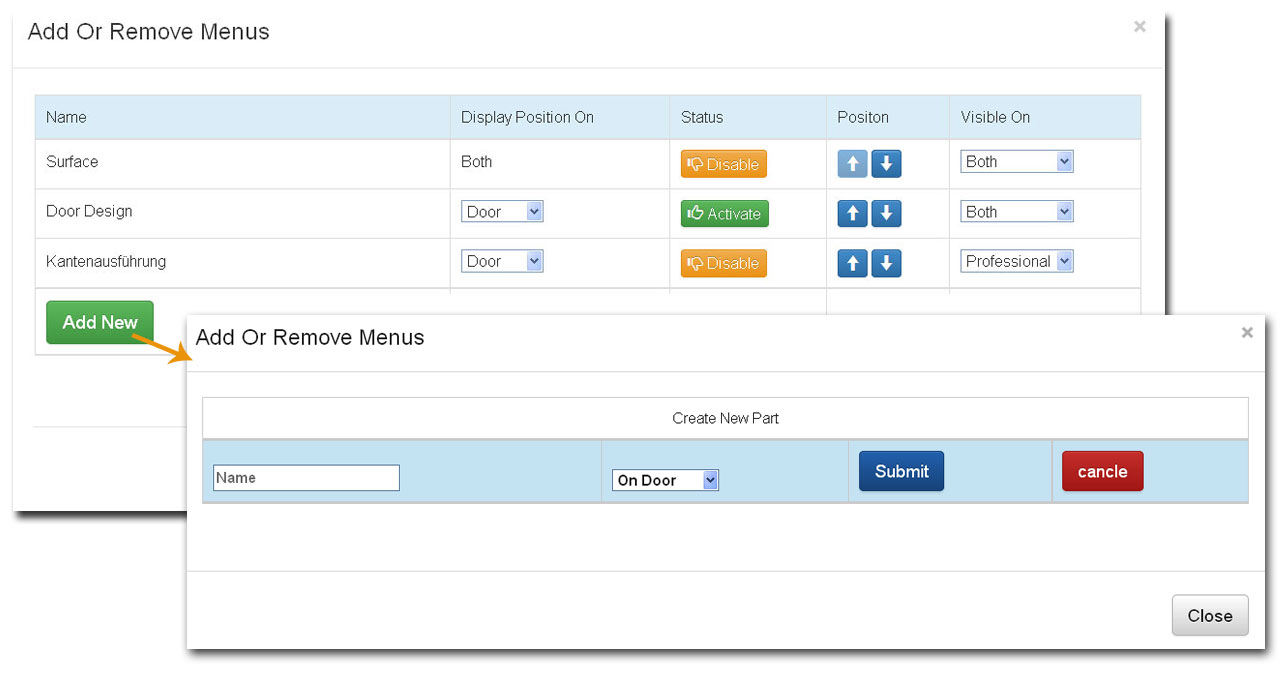
Click on +/-, a pop opens showing you all the available steps with the options. Under the last step you will find the button Add New which is for adding a new step inside the flow. Click on it and a pop up opens, here you can give a name to the new step, then you can choose from drop down if this new step should be available for only door or only frame or for both, selecting any one and click on Submit a new step is added. This new step is available for all the models and if for any particular model it is not relevant then the same can be deactivated for that model easily by clicking on the button Deactivate when inside the tab for that model. And if you want to deactivate the step for all models that also can be easily done by simply going into the manage tabs interface by clicking on +/-, a pop up opens showing all the tabs as a list and adjacent to each name you will find the various options such as, selecting if the tab is for only door or only frame or both, then you will find the option Activate and Deactivate, for all active tabs you will find the Deactivate button and for all deactivate tabs you will find the button Activate. Also you will find the options to control the flow by positioning the tabs by the move up and move down arrows. Using the up and down arrows you can change the positions of the tab in flow easily, thereby you can decide easily which tab comes first followed by which next etc.
Organising a Step/Tab:
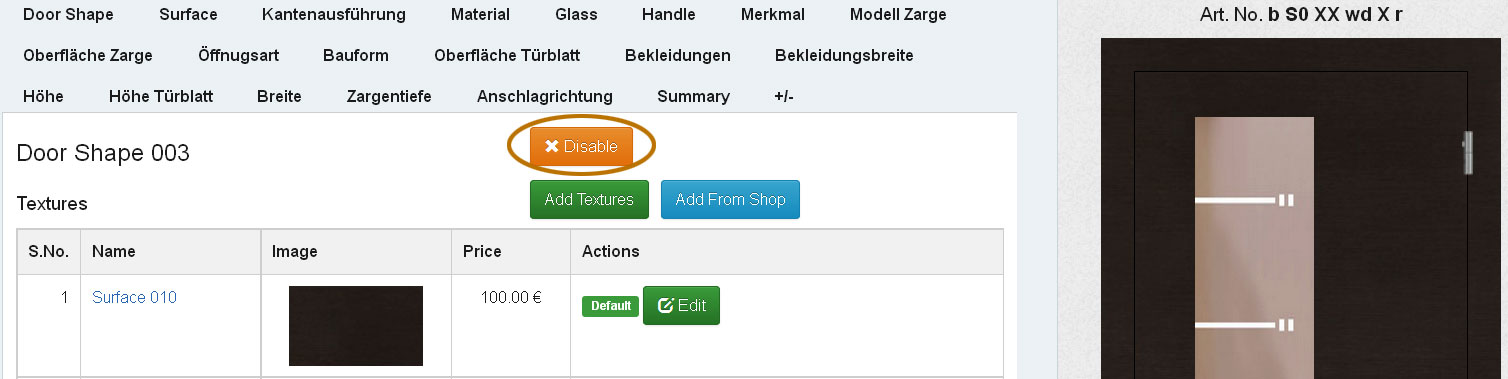
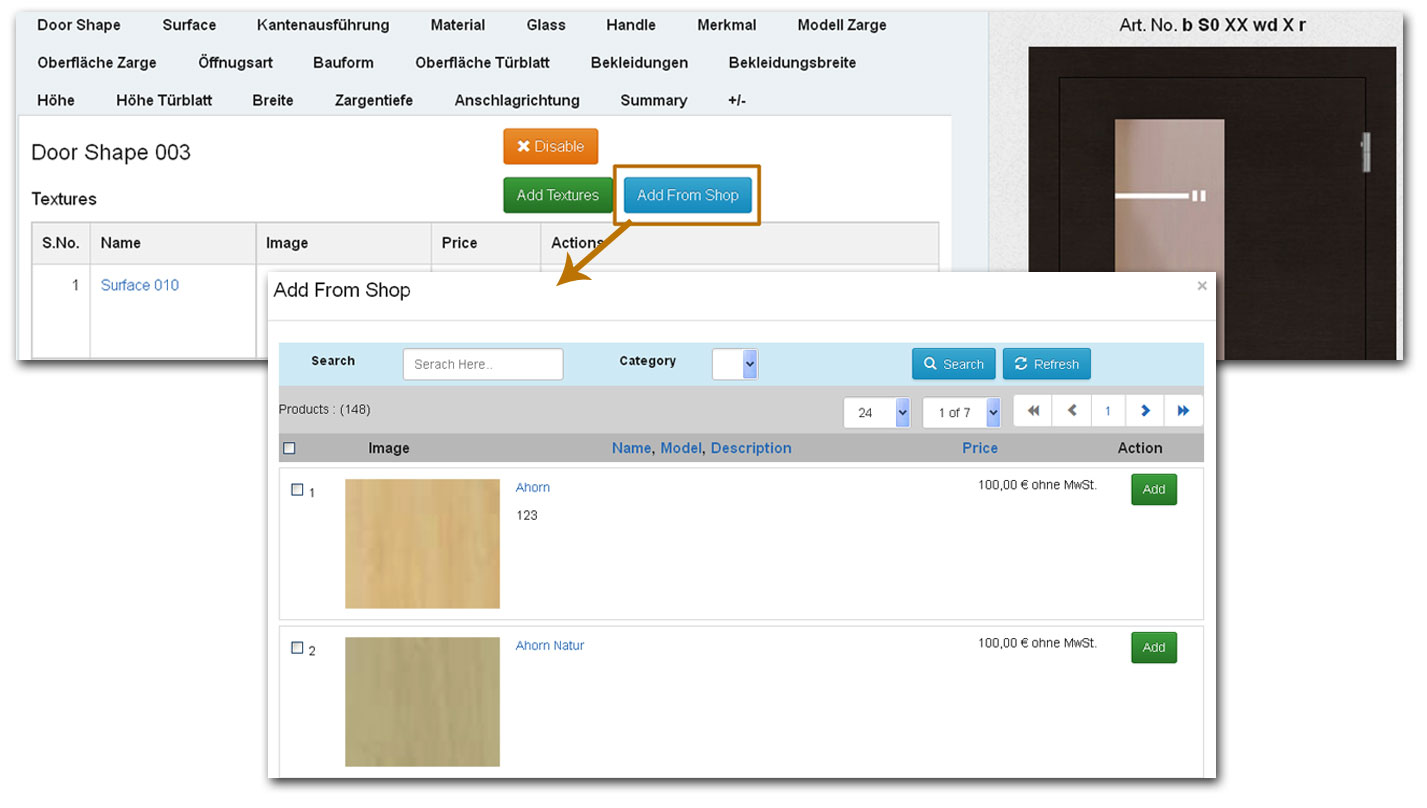
Adding a step or tab is only a small part of configurator, the most important part is organising the Tab properly, giving it options or values or products. As explained in general all the active steps are available for all the models. It is possible to individually deactivate a tab for a model, if deactivated then this tab is no longer available in the front end configurator for selection. To deactivate simply click on the Deactivate button which you can see on top. And if a certain tab is already deactivated then you will find the button Activate, clicking on it activates the tab for the model. Once you are clear with the status then in next step you can choose the possible options you want to give for selection. You can do this simply by clicking on Add Parts. When clicked on Add Parts, based on the step/tab you are in a pop up opens showing you the available options. You can select there from the available option values that are applicable for the current model. For example if you are in the step Handles, and the current model is a glass door then you can only select Handles which can suit the glass doors from the all the handles available. If you do not find the suitable part already from the list then it is also possible for you to add a new value or product directly in the same window. Click on Add New and here you can give a Name, upload an image, add price, give short code for article number text and more to the new part or product you wanted to add. Also it is easy to add products in shop as parts to the tab. If the product is readily available in shop then simply click on the button From Shop. A pop up opens showing all the shops products, you can in this window, search and filter for the shop products via the search box or via the drop down category selection. For every product row you will find on the right the button Add, clicking on it will add the product to the tab for this model already as well as make the product available for selection for the other models for this tab. In this way it is possible to add values or products for individual tabs. All these values or products added for the tab are available for selection in the end user configurator so you have to make sure that only the right items are added to the tabs and right tabs are defined to the model. Further you can assign default parts for the model while creating a new model, you can easily choose which part or value you want to make default for a model by simply clicking on Make as Default button which you find for every part or product inside all tabs.
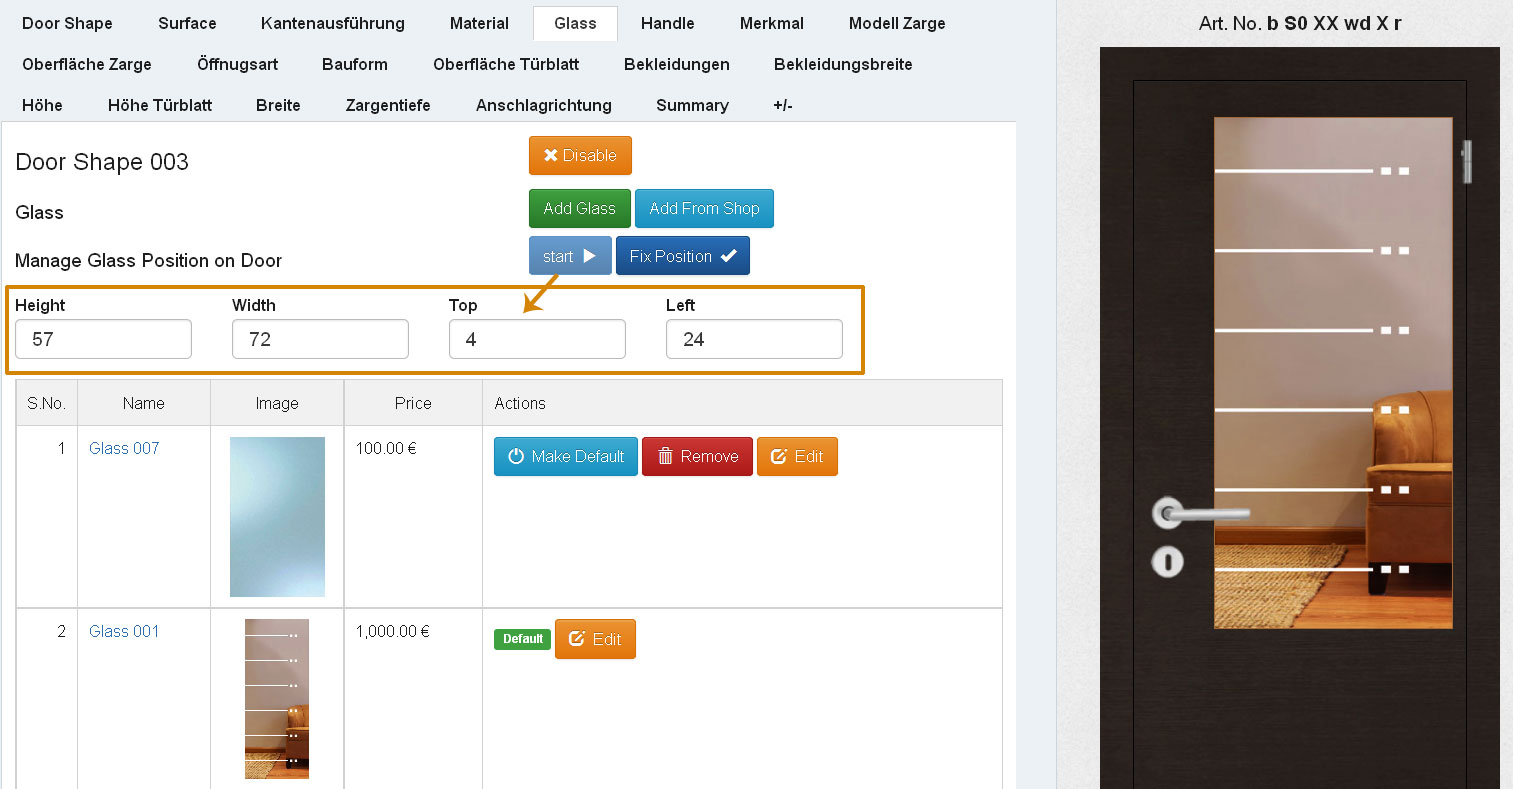
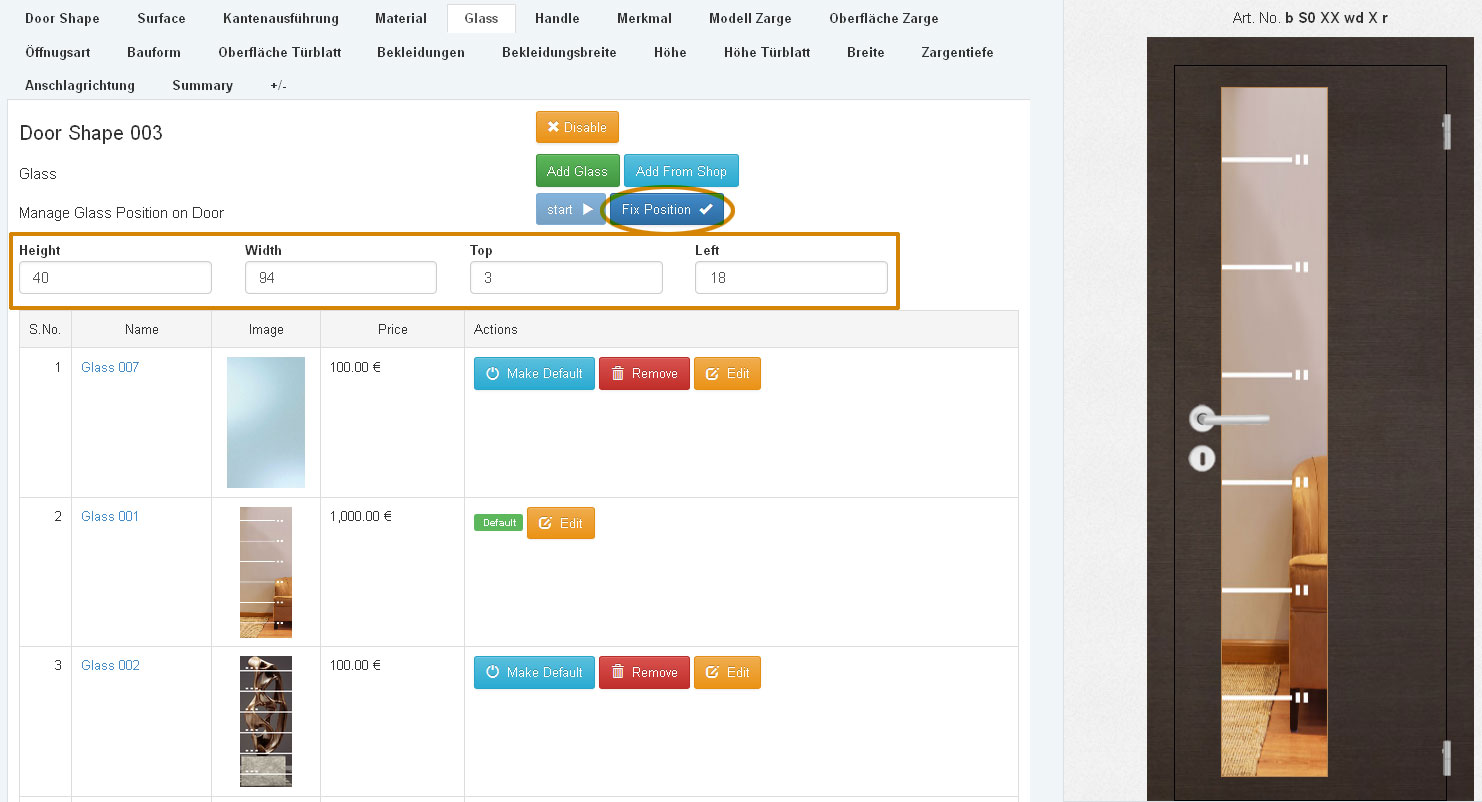
Positioning of Part/Product for Graphical Configurator:
For the graphical version of the configurator it is important that you position the part or product in the right place on the door, take for example if you have in the configuration Glass selection part, then you need to define where you position the glass on the door for this model. To do that, click on the option Select Position, this button you will find under the Add parts button, once you click on it then on the right side frame where your door model is being displayed the part appears. You can easily move and position the part by clicking on it and holding it, you can very easily and freely move the part to which ever position you prefer. Further it is possible to resize the part. Simply place the mouse over the right edge of the part or at the bottom cross section to increase or decrease the size of the part diagonally. Using this move and resize option you can easily position the glass, handles, hinges or any other accessories of door easily, once you finished the positioning of the part simply click on the button Position to lock the position of the part. All the different parts then only applied on the positions you have locked.
Summery
To summarize it is very easy to create using the Back End of Configurator different Flows/Models, different steps/tabs inside the Flows/Models and different Parts/Products inside individual steps. Not only that you can also make a default part for each step as well as positions the parts inside the steps. So using this dynamic back end you can create as many flows as you want and allow the end user different possible customizable options for configuring a door of his choice but with in the options you provide.